TL;DR: Spring transplanting gives trees the best chance at survival by moving them during dormancy before new growth begins. Success requires proper timing (November–February in most regions), correct root ball sizing (8–12 inches wide per inch of trunk diameter for small trees), careful digging techniques, and consistent watering during the establishment period.
Key Takeaways:
- Transplant during dormancy (late fall through early spring) when trees aren’t sustaining active canopy growth
- Dig a saucer-shaped hole 3 times wider than the root ball with sloping sides
- Position the root flare at or slightly above ground level to prevent settling issues
- Water deeply and regularly for 1–2 years while roots establish
- Small trees (under 2 inches trunk diameter) can be DIY projects; larger specimens require professional equipment
Table of Contents:
- Why Transplant Trees in the Spring?
- Preparing Your Tree for the Move
- Step-by-Step Guide to Transplanting
- Common Mistakes to Avoid
- Frequently Asked Questions
- Quick Recap
- Professional Tree Services in Indianapolis
Why Transplant Trees in the Spring?
Spring transplanting leverages dormancy to minimize stress and maximize survival rates. Moving a tree while it’s dormant—before buds expand and leaves emerge—gives it the strongest foundation for recovery. During dormancy, trees aren’t expending energy to sustain a canopy, and their food reserves are at peak levels. This timing allows roots to establish in their new location before summer heat arrives.
The optimal transplanting window runs from November through February in most regions, though local climate variations apply. Avoid transplanting when air temperatures exceed 80°F or when the ground is frozen. Trees moved during this dormant period have several months to develop new roots before facing the stress of summer drought and heat.
Early spring planting also means roots can take advantage of natural spring moisture. As temperatures warm and rainfall increases, newly transplanted trees receive the water they need without excessive irrigation demands.
Preparing Your Tree for the Move
Successful transplanting starts days before you dig, with proper site selection and tree assessment.
Call Before You Dig
Contact 811 or visit call811.com at least 2–3 days before beginning work. This free service locates underground utilities—gas lines, electrical cables, water pipes—preventing dangerous and costly accidents during excavation.
Calculate Root Ball Size
The trunk diameter determines how large a root ball you’ll need to preserve. Measure trunk diameter 4 feet from the ground: wrap measuring tape around the trunk, note the circumference in inches, then divide by 3.14 (pi).
For small trees (2 inches diameter or less), the root ball width should be 8–12 inches for each inch of trunk diameter. A tree with a 1.5-inch diameter needs a root ball 12–18 inches wide.
Water Thoroughly
Hydrate the tree 1–2 days before transplanting. Moist soil holds together better during the move, reducing root damage and making the root ball easier to handle.
Prepare the New Location
Dig the new planting hole before removing the tree from its current spot. This minimizes the time roots are exposed to air and stress. The hole should be 2–3 times the width of the root ball but only 1–2 inches deeper than the root ball height.
Step-by-Step Guide to Transplanting
Follow these detailed instructions for a smooth transition to the tree’s new home.
Step 1: Dig the Planting Saucer
Create a wide, shallow saucer rather than a deep pit. The saucer should be 3 times wider than the root ball with gently sloping sides. This shape gives developing roots loose, friable soil to penetrate as they spread horizontally through the upper 6–12 inches of soil.
Dig only deep enough so the root flare—the subtle curve where main roots enter the soil—sits at or slightly above ground level. Planting too deep is one of the most common and damaging mistakes in tree transplanting.
Roughen the sides of the saucer with your shovel to break up any compaction. The bottom should remain undisturbed or firmly packed to prevent the root ball from settling below grade.
Step 2: Create the Root Ball
Using a sharp spade, dig a trench around the tree in a circle matching your calculated root ball width. Cut straight down 1–2 feet, then angle inward to round out the bottom of the root ball.
Work carefully to keep the root ball intact. For containerized trees, cutting the bottom off the container before placing the tree helps maintain ball integrity. For balled-and-burlapped stock, keep wrapping in place during the move to prevent damage.
Step 3: Wrap and Secure
Cut a piece of burlap large enough to cover the entire root ball. Carefully tip the root ball to one side, slide the burlap underneath, then roll the ball onto the burlap. Wrap completely and secure with twine.
This wrapping protects the root ball during transport and handling. Never lift a tree by its trunk—always support it from underneath the root ball.
Step 4: Position in the Saucer
Lower the tree gently into the prepared saucer, positioning it so the root flare is at or no more than 1–2 inches above ground level. Step back and check from multiple angles to ensure the trunk stands perfectly vertical.
For balled-and-burlapped trees, remove at least the top one-third of wire basket and burlap after positioning. Remove all synthetic burlap or plastic completely, as these materials don’t biodegrade and can restrict root development.
Step 5: Backfill and Settle
Hold the trunk steady while adding native soil around the root ball. Fill in layers, tamping lightly or watering between layers to eliminate air pockets without creating excessive compaction.
Use the soil excavated from the saucer for backfill. While amending soil can help in some situations, creating a transition zone is better than completely backfilling with amendments, which can cause moisture gradients and confine roots to the planting hole.
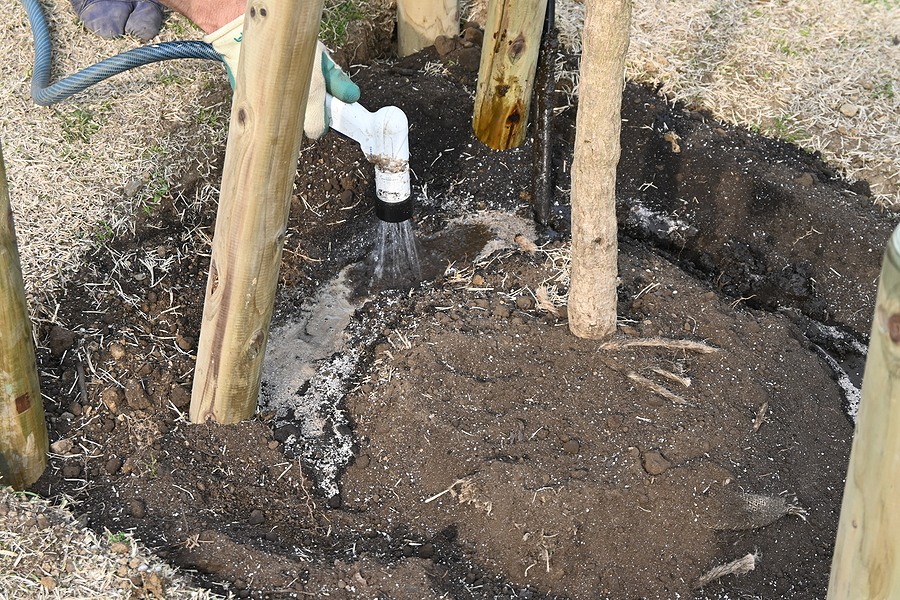
Water slowly and thoroughly after backfilling to settle soil around roots and provide immediate hydration.
Step 6: Mulch Properly
Apply 1–1.5 inches of organic mulch in a ring extending at least 4 feet from the trunk. Keep mulch at least 4 inches away from the root flare to prevent moisture buildup against the bark.
Wood chips and composted materials work well. Avoid “volcano” mulching—piling mulch against the trunk creates habitat for pests and fungal diseases.
Step 7: Stake Only If Necessary
Most newly transplanted trees don’t need staking. Unstaked trees develop stronger, more wind-firm roots and appropriate trunk taper by swaying naturally in the breeze.
Stake only if the tree has a very light root ball, sits on a hillside, or faces persistent wind or foot traffic. Use 2–3 stakes with wide, flexible ties placed no higher than one-third up the trunk. Allow “wiggle room” so the top can sway. Remove stakes after one year to prevent them from interfering with growth.
Common Mistakes to Avoid
These frequent errors can compromise transplant success and long-term tree health.
Planting Too Deep
When the root flare sits below grade, roots suffocate from lack of oxygen and bark remains too moist. Always position the flare at or slightly above ground level, accounting for settling.
Inadequate Root Ball Size
Removing too little soil with the roots reduces the tree’s ability to absorb water and nutrients. Follow the 8–12 inches per trunk diameter guideline for small trees. Larger specimens require professional assessment.
Compacted Planting Hole
Using an auger or digging a narrow pit creates compacted walls that roots struggle to penetrate. Always dig a wide, saucer-shaped hole with roughened sides.
Overwatering or Underwatering
Newly transplanted trees need consistent moisture but not saturation. Use a stiff wire to check soil moisture: dry soil resists penetration, while muddy wire indicates oversaturation. Adjust watering frequency based on weather, soil type, and drainage.
Planting at the Wrong Time
Transplanting during active growth or extreme heat increases stress and mortality risk. Stick to the dormant season window, and avoid planting when temperatures exceed 80°F.
Leaving Synthetic Materials
Synthetic burlap, plastic, and wire baskets that aren’t removed can girdle roots and destabilize trees as they grow. Remove all synthetic materials and at least the top third of natural burlap and wire.
Excessive Pruning
Trees don’t need pruning to “balance” top growth with roots. Restrict pruning to diseased, damaged, or dead branches only.
Frequently Asked Questions
When is the absolute best time to transplant trees?
The optimal window is during dormancy, from late fall through early spring before bud break. In most regions, November through February offers the best conditions. This timing allows roots to establish before summer stress while the tree isn’t sustaining active canopy growth.
How do I know if my tree is too large to transplant myself?
Trees with trunks larger than 2 inches in diameter should be transplanted by professionals. Large root balls can weigh hundreds of pounds and require specialized equipment like tree spades. Attempting to move large trees without proper tools risks severe root damage and personal injury.
How much water does a newly transplanted tree need?
Apply 1–1.5 gallons of water per inch of trunk diameter at each watering. A tree with a 1-inch diameter trunk needs at least 1 gallon. Water at least twice weekly for the first 1–2 years, increasing frequency during hot weather or in sandy soil. Larger containerized trees may require daily watering. Up to 10 gallons per diameter inch per week may be needed during peak summer heat.
Should I fertilize my tree after transplanting?
Adding fertilizer at planting typically doesn’t speed establishment. Wait until the next growing season, then consider a small amount of slow-release fertilizer (≥50% nitrogen as water-insoluble) only if the tree shows signs of stress or was planted in poor soil. Soil testing before planting provides better guidance than routine fertilization.
Quick Recap:
- Time it right: Transplant during dormancy (November–February) when trees aren’t sustaining active growth
- Call 811: Locate underground utilities before digging to prevent accidents
- Size matters: Calculate proper root ball dimensions—8–12 inches wide per inch of trunk diameter for small trees
- Dig wide, not deep: Create a saucer-shaped hole 3 times wider than the root ball with sloping sides
- Position carefully: Place root flare at or slightly above ground level to prevent suffocation
- Remove containers completely: Cut away all synthetic materials and top third of natural burlap/wire
- Water thoroughly: Apply 1–1.5 gallons per trunk diameter inch at each watering, twice weekly minimum
- Mulch wisely: Apply 1–1.5 inches of organic mulch in a 4-foot radius, keeping it 4 inches from the trunk
- Skip unnecessary staking: Most trees establish better without support unless facing specific challenges
- Know your limits: Trees over 2 inches in diameter require professional transplanting services
Conclusion
Proper tree planting and care is an investment in the health of your landscape and the environment. By following these guidelines—choosing the right tree, preparing the site effectively, and nurturing the tree after planting—you can ensure strong establishment and long-term growth.
Remember, trees not only beautify our surroundings but also provide shade, reduce energy costs, and improve air quality. Your efforts today will create lasting benefits for generations to come. Nurture your trees with care, and they will reward you with unmatched beauty and ecological value.
If you’re looking for expert assistance with tree planting, care, or maintenance in the Indianapolis area, our professional tree services are here to help. Contact us today to schedule a consultation and ensure that your trees thrive for years to come!
Related Post: Digging Deep into Green Living with Backyard Tree Planting